Extending a Logical Volume

While SSH'ing into my media server the other day, I noticed that my root directory was quickly starting to become pretty full.
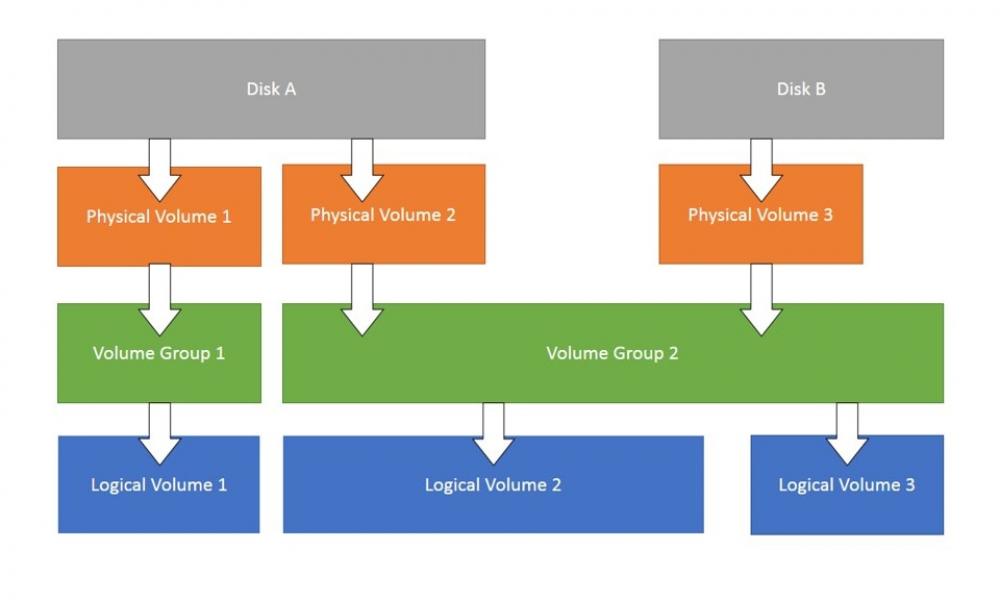
Lucky for me, I've set my operating system up to use LVM. For those who aren't familiar with Logical Volume Management, it's a much more flexible and powerful way of managing your file system than the traditional method of partitioning a disk.
The advantages of LVM shine in situations like the one I've run into. In LVM, if I have space remaining on my disk, I can simply extend the logical volume my that operating system lives in to take advantage of additional free space on my disk. Today's guide will cover this process and show you step by step how to extend your logical volume.
To start, let's go ahead and cover how to view our physical volumes, volume groups, and logical volumes with the commands pvs to show physical volumes, vgs to show volume groups, and lvs to show logical volumes.
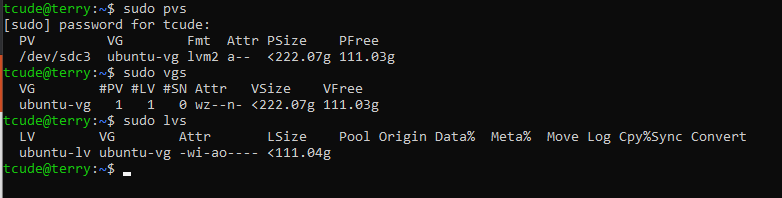
Taking a look at the output here, we can see that we have a physical group already created with 111.03 gigs free, along with a volume group that also has the same 111.03 gigs free. This will make our project much simpler since we're not going to have to mess with expanding either of those. Taking a look at our logical volume, we can see that it's set to currently only be 111.04 gigs. Let's expand that to take advantage of more of our disk space.
We will run the command lvdisplay to show a bit more information on our logical volume. We're going to want to confirm the path of our logical volume in order to expand it.
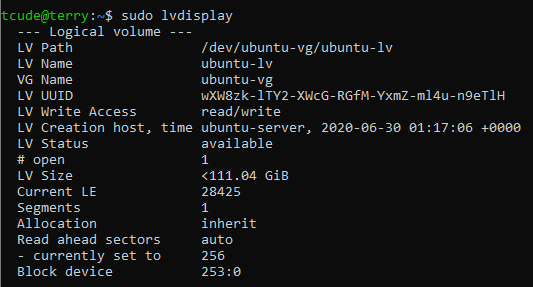
We see here that our logical volume is located at /dev/ubuntu-vg/ubuntu/lv
Now that we've learned a bit about how our LVM structure is set up, we're ready to expand our logical volume. I'm going to do so by running the command:
sudo lvresize -L +40G --resizefs ubuntu-vg/ubuntu-lv
To break things down on what this command is doing, we're utilizing the lvresize command to extend the logical volume, with the -L option to specify that we're going to use a new size. The +40G is specifying that we'd like to extend our logical volume by 40 gigs. You're welcome to use the rest of the space on your disk but I'm going to keep some of the space un-allocated for future projects
After running the command, we can ensure it worked correctly by running df -h to view how much space is free within our logical volume.

As we can see, our logical volume has a size of 149 gigs, with 46 gigs free. We now have a bit more breathing room than we did prior to extending our logical volume.
In conclusion, that's all there is to it! As you can see, LVM is extremely flexible and also fairly easy to use. If you do run into any problems or have any questions, feel free to comment below.