Setting Up a Jenkins Pipeline with Gitea for Packer Image Builds: A Step-by-Step Guide
A few months ago, I transitioned from Proxmox back to VMWare. My shift was mostly motivated by a discovery that the Infrastructure as Code (IaC) tools associated with VMWare are much more robust. Currently, I'm leveraging Hashicorp Packer and Terraform to shape my infrastructure within VMWare. Here's a brief breakdown: Packer constructs an image, and then Terraform retrieves this image to build the infrastructure based on it. I'll delve deeper into this topic in a future post, but this gives you a glimpse into my journey.
Once I had Packer and Terraform seamlessly integrated with VMWare, a challenge arose. Each time I tweaked my Packer repository, I then had to manually trigger the packer build command on my local setup. Subsequently, I would then have to patiently wait for the build process to conclude.
It dawned on me that this routine was a prime candidate for automation using a Jenkins Pipeline. If you're unfamiliar, a Jenkins pipeline is a scripted, automated sequence—often scripted in a Jenkinsfile—designed for continuous integration and delivery. It takes care of building, testing, and deploying code modifications. And today, I'm excited to guide you through setting up your very own Jenkins pipeline!
Prerequisites
- This guide assumes you already have Jenkins and Gitea up and running.
- This guide assumes you already have a working Packer setup
If there's interest in these topics, I'd be more than happy to write detailed blog posts about them. Just let me know in the comments below!
Prepping the Jenkins Instance
Assuming you already have Jenkins installed on a VM or within a container, you will need to take care of a couple of quick steps doing the following
Install Packer on the Jenkins Host:
- If you're utilizing Jenkins within Docker, execute
docker execto enter the container and proceed with the installation there. This approach might not be the best practice, but it will suffice for our purposes. Refer to this link for detailed Packer installation instructions.
Additional Dependencies:
- During my setup, I noticed that
mkisofswas essential for Packer to function correctly on my machine. You may encounter a similar requirement. To install it, simply runapt install mkisofs.
Getting Started with Jenkins
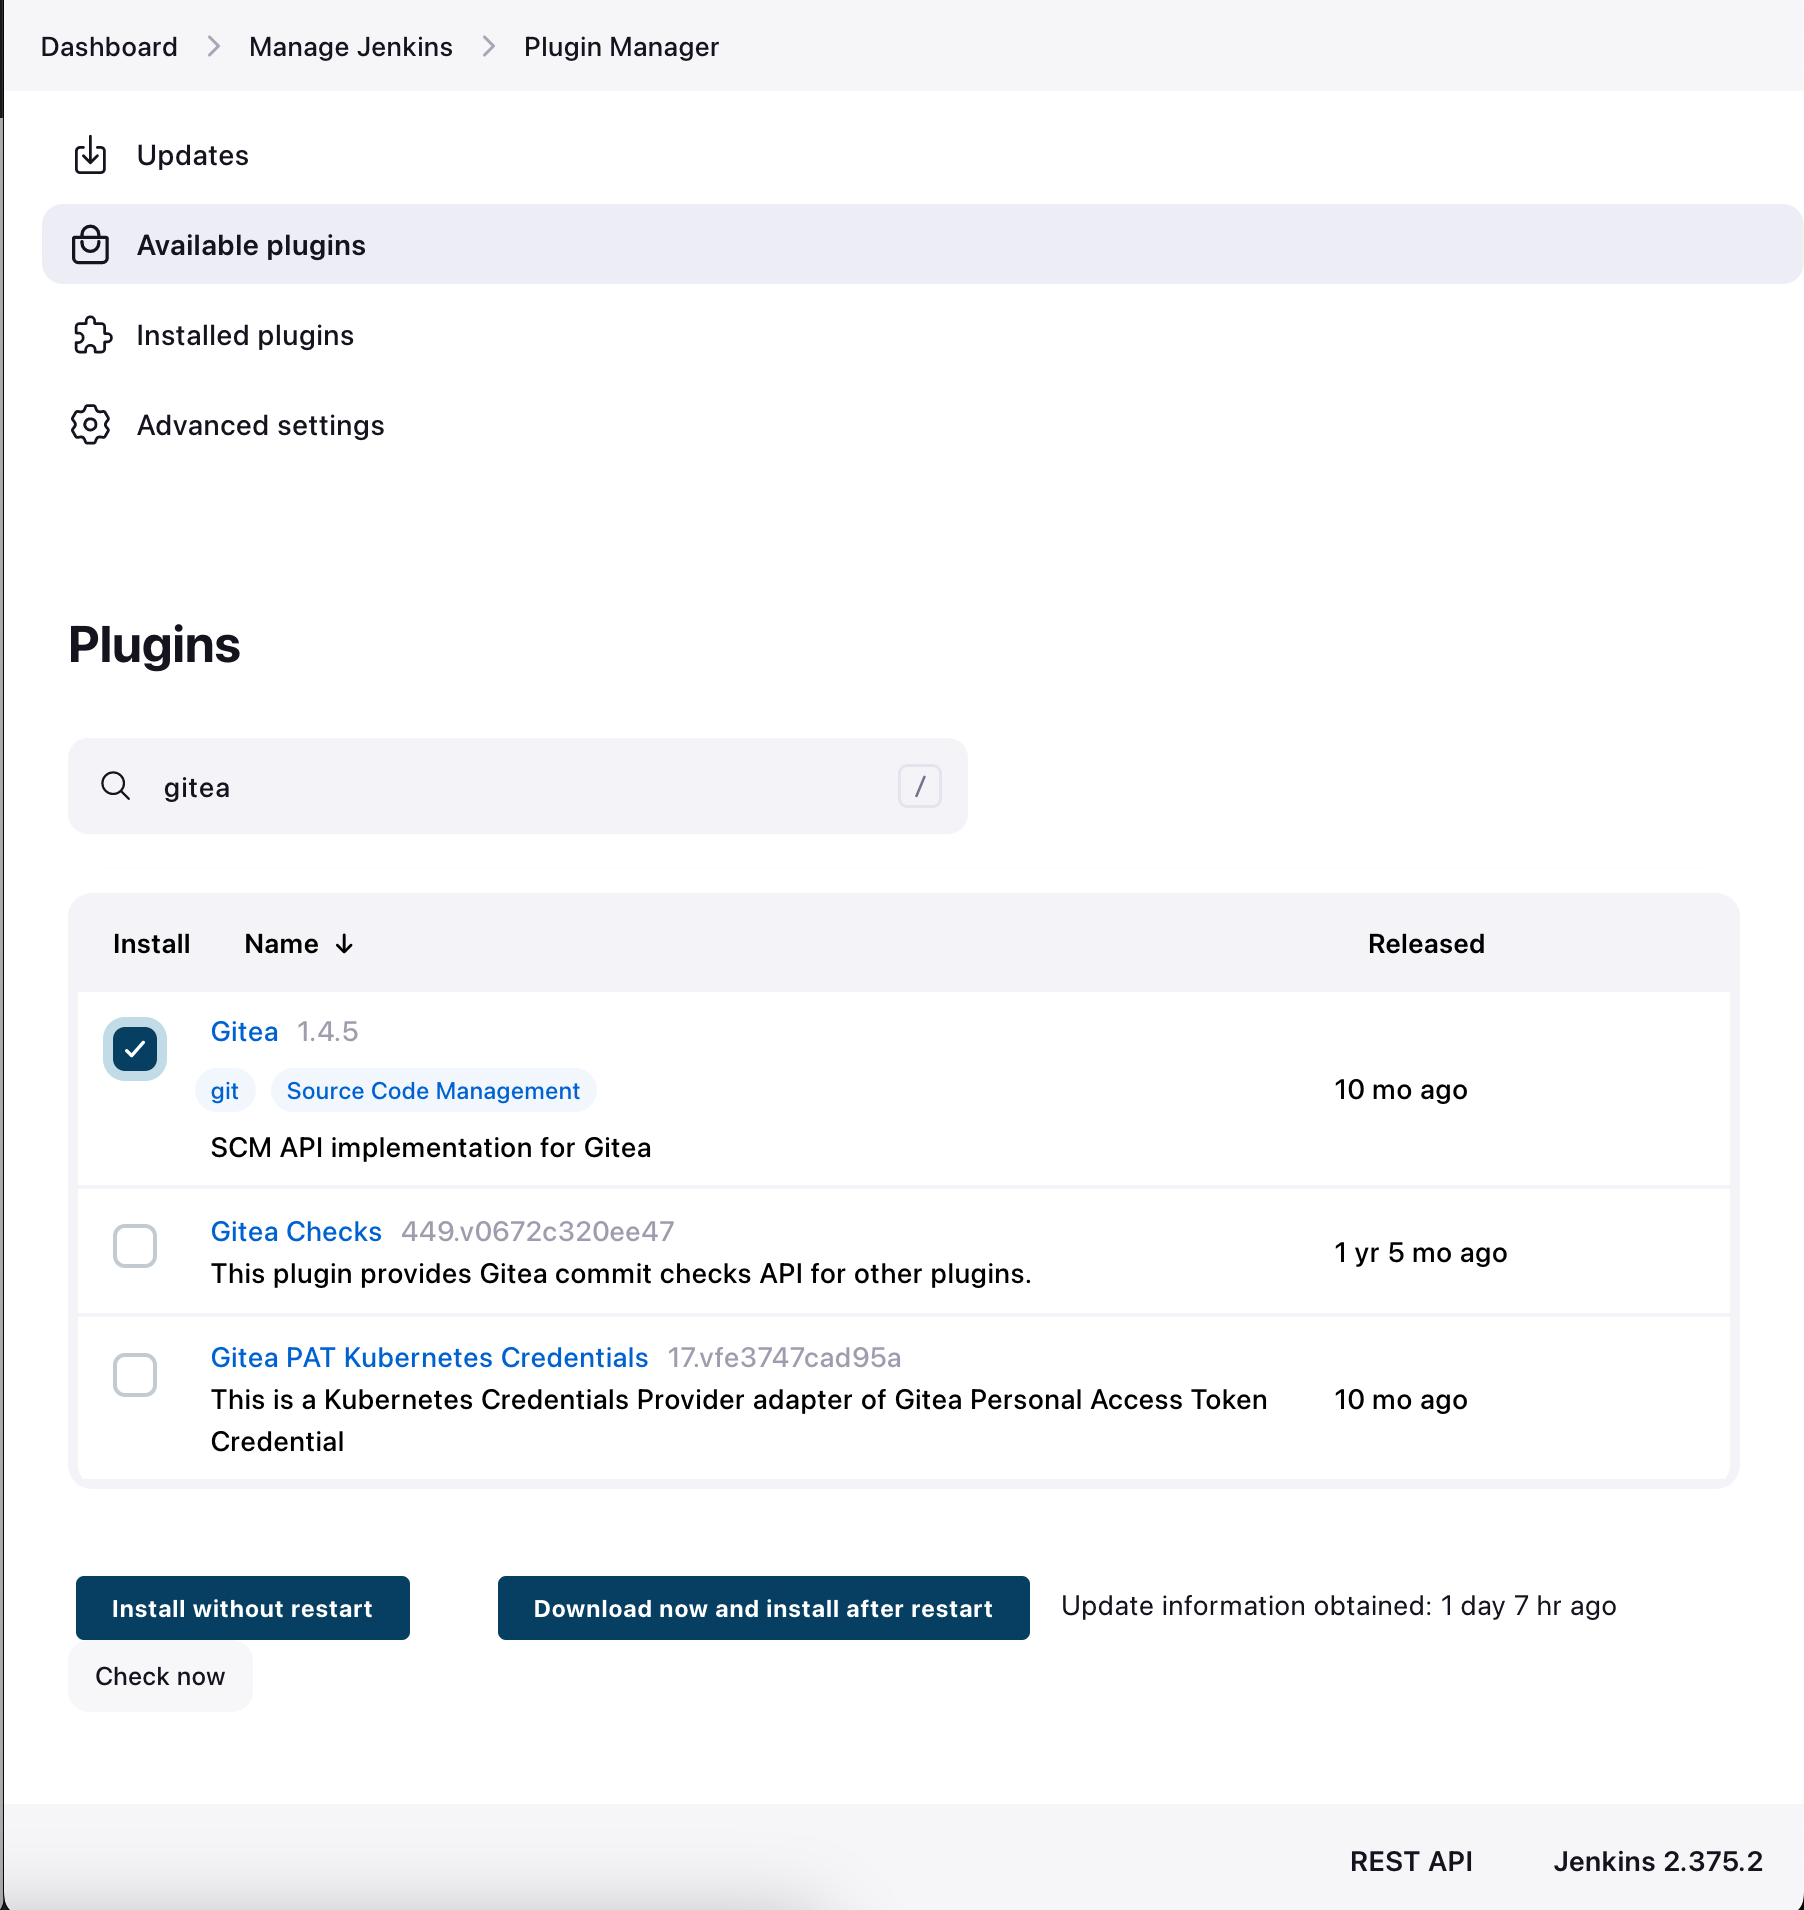
To start, you will need to navigate to https://<your_jenkins_instance>/manage/pluginManager/available and then search for the Gitea plugin.
Once the plugin has been downloaded, installed, and Jenkins has been restarted, navigate to https://<your_jenkins_instance>/manage/configure. Here you can scroll down and begin integrating your Gitea instance with Jenkins:
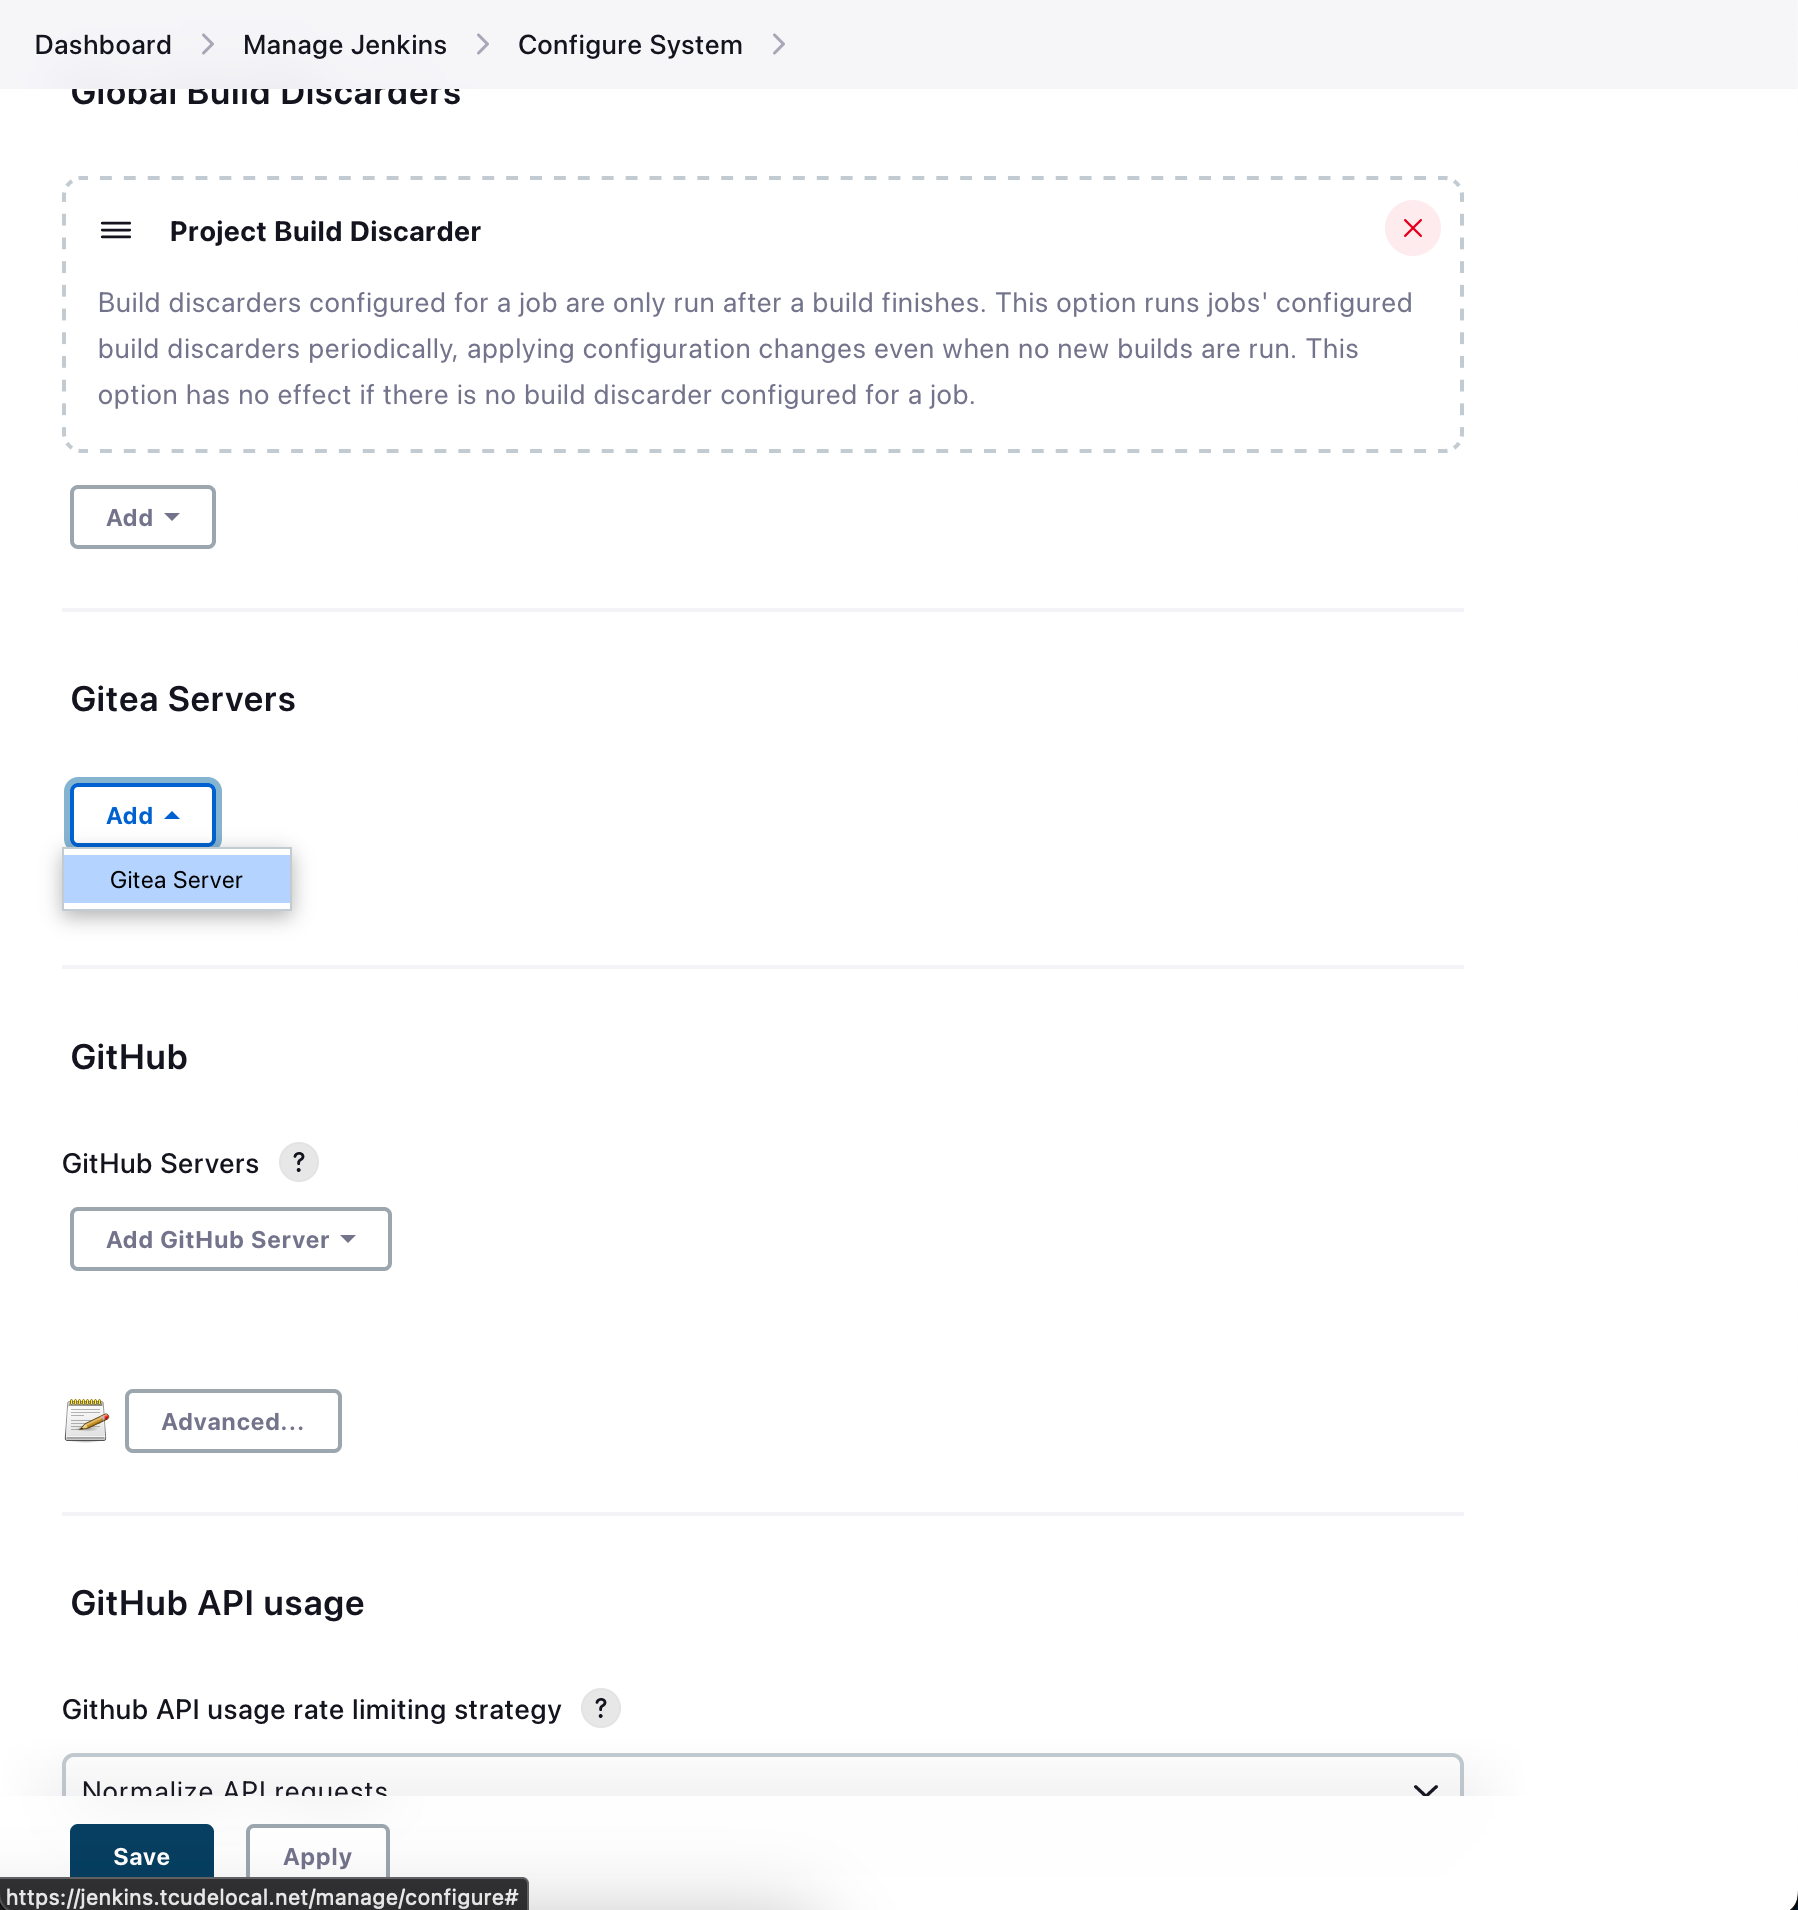
Simply click Add and then select Gitea Server
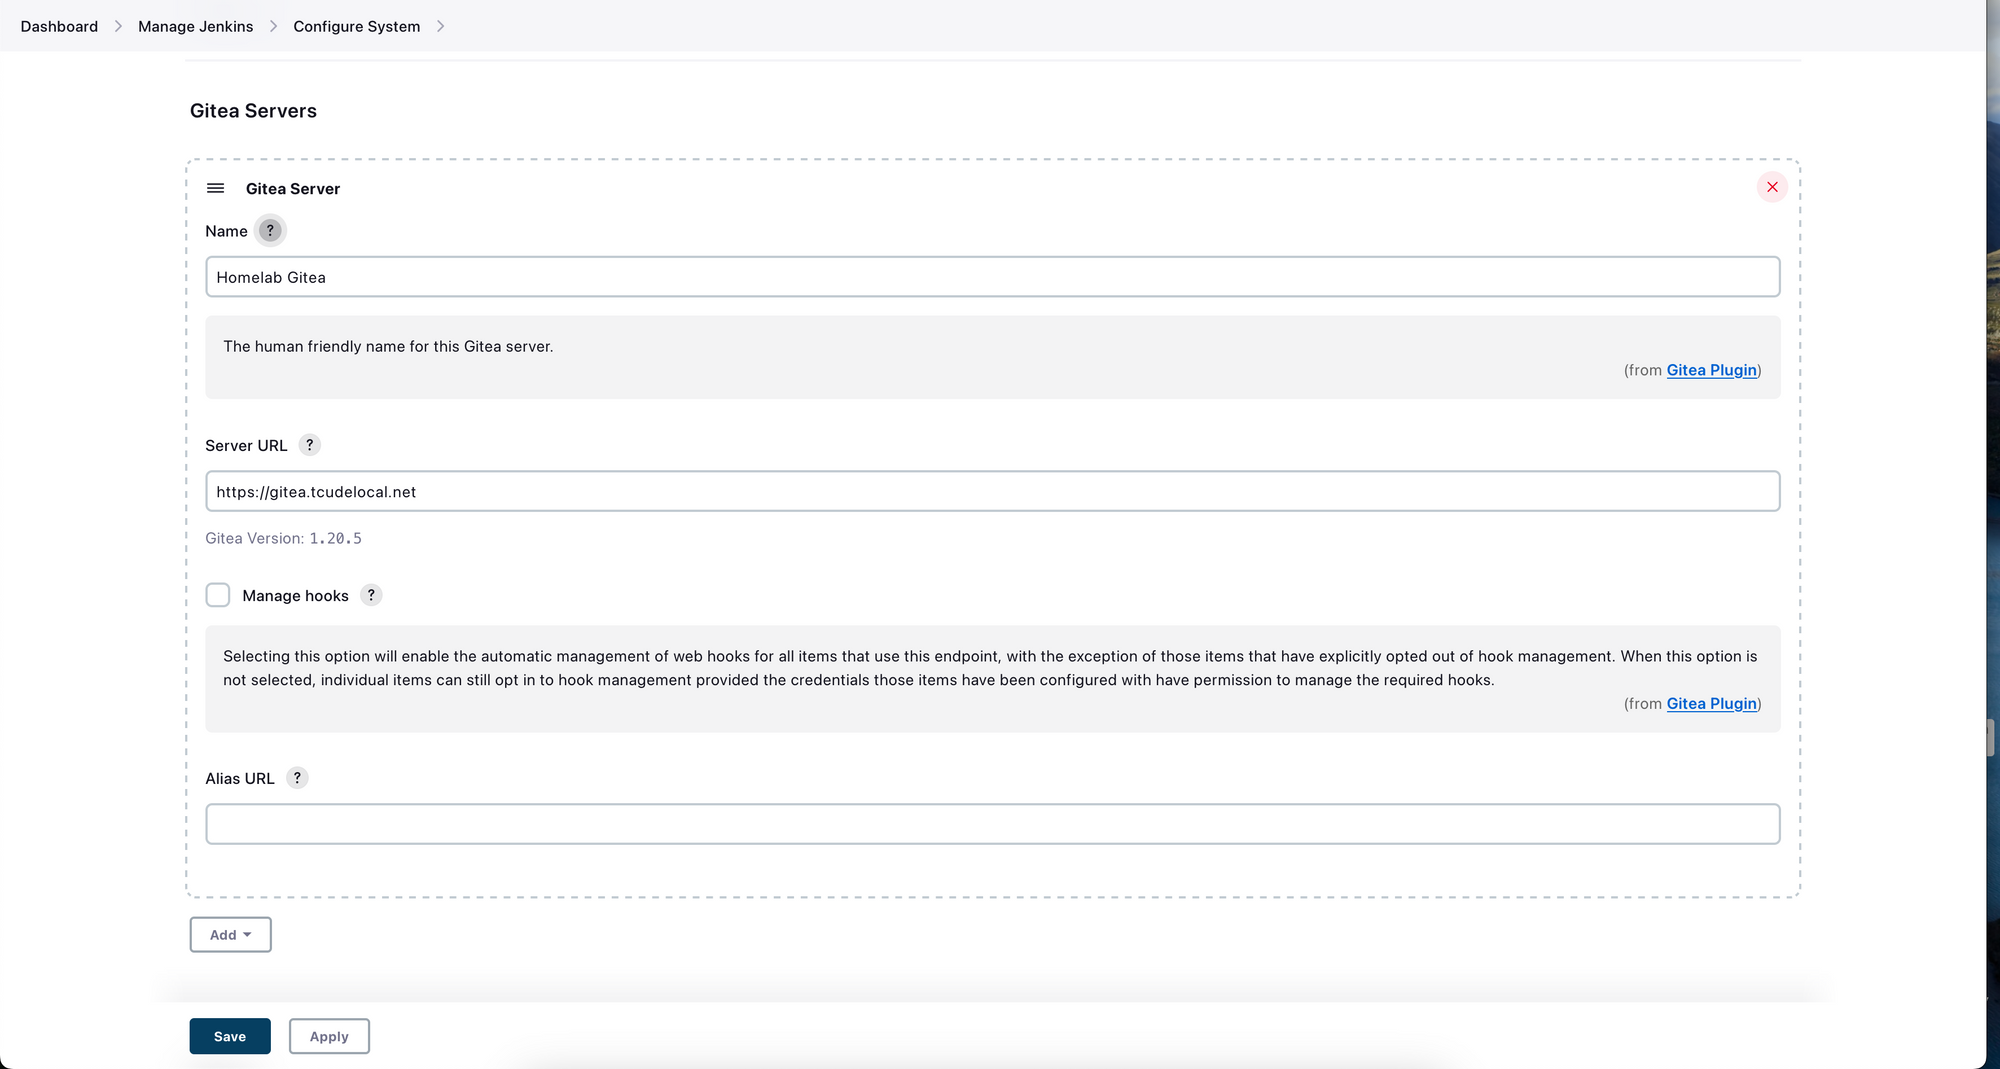
Next, in the Name field, give your Gitea instance a friendly name. In the Server URL field, provide the URL for your Gitea instance.
Preparing Gitea
Before we can proceed, we need to take a moment to create a new user named Jenkins within Gitea. While you could theoretically use your personal/administrator credentials in the later steps, it's best to go ahead and follow the principle of least privilege and create a user that only has access to your Packer repository.
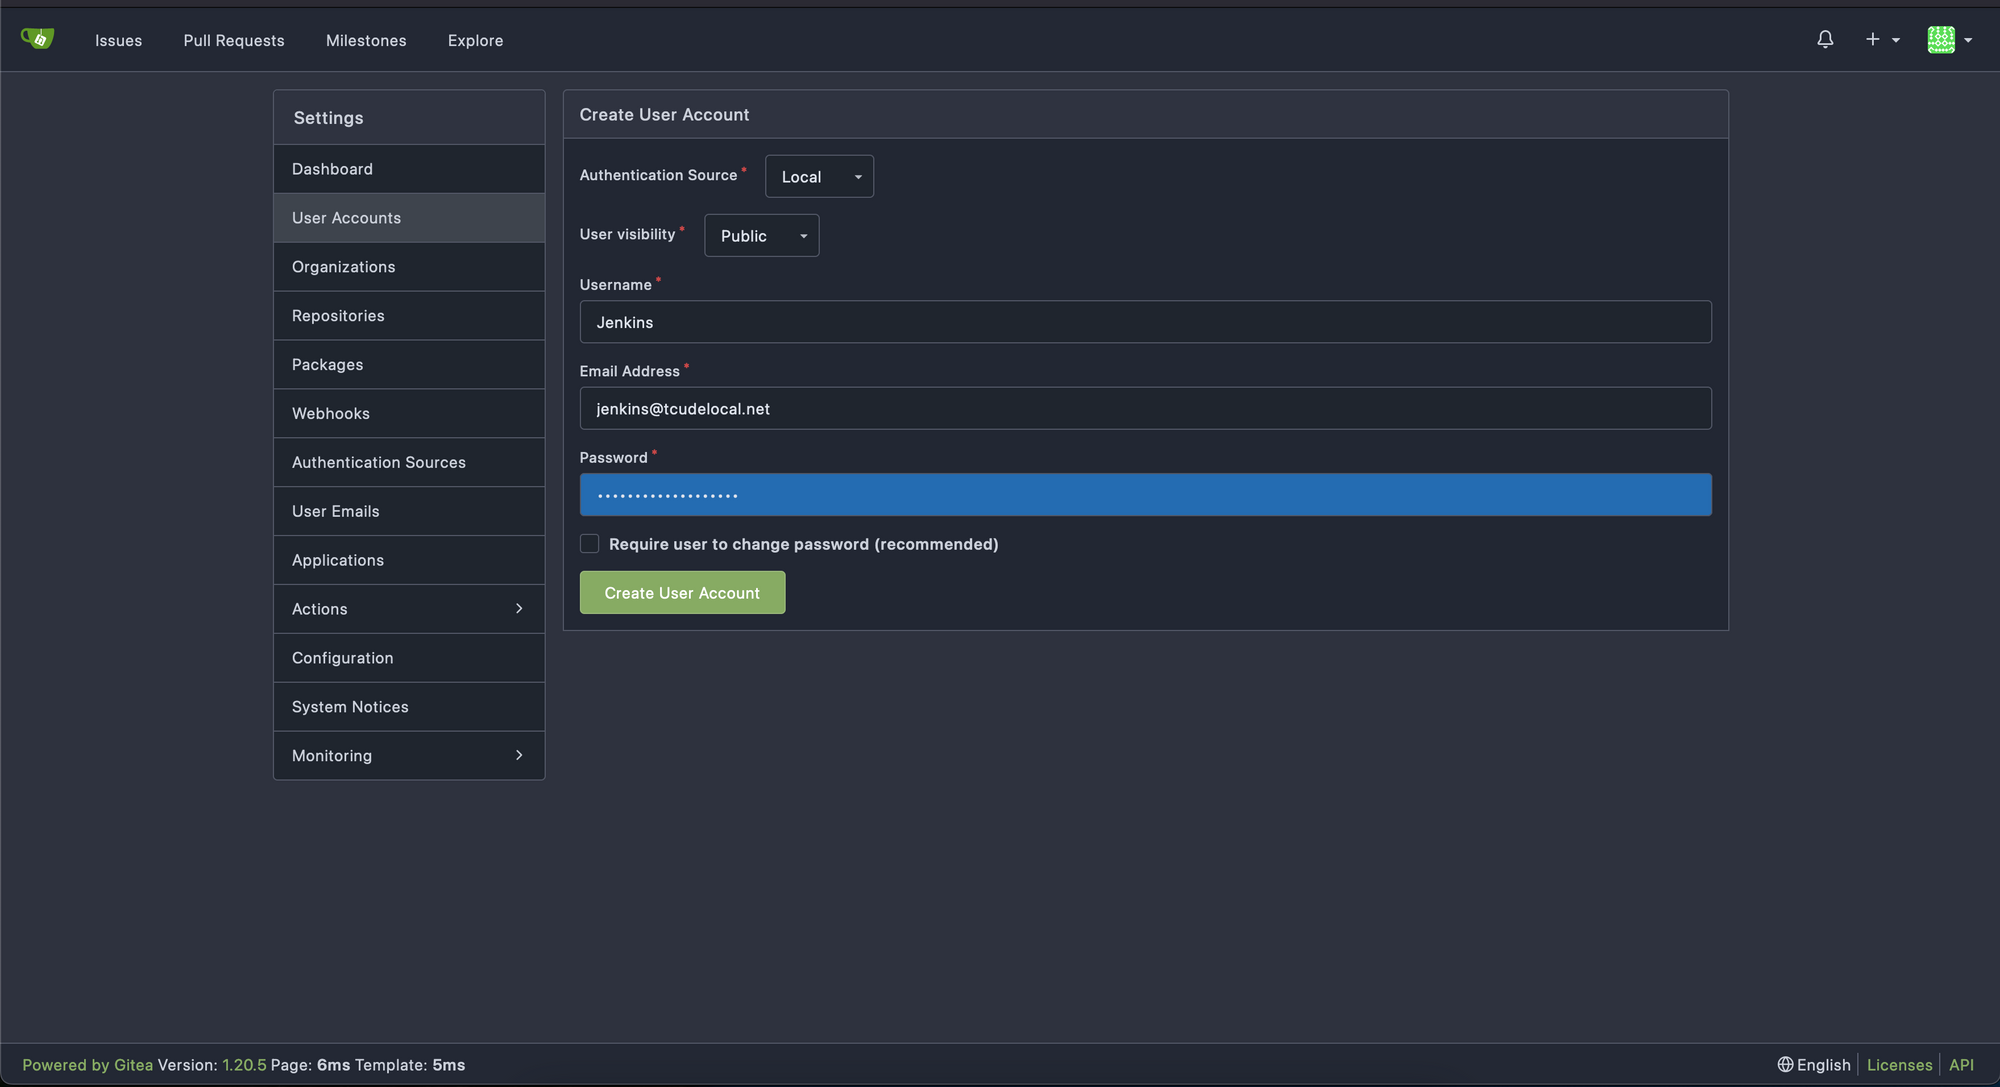
To do this, start by navigating to Site Administration > User Accounts. Here you can select Create User Account. Set your username to Jenkins and then provide a password.
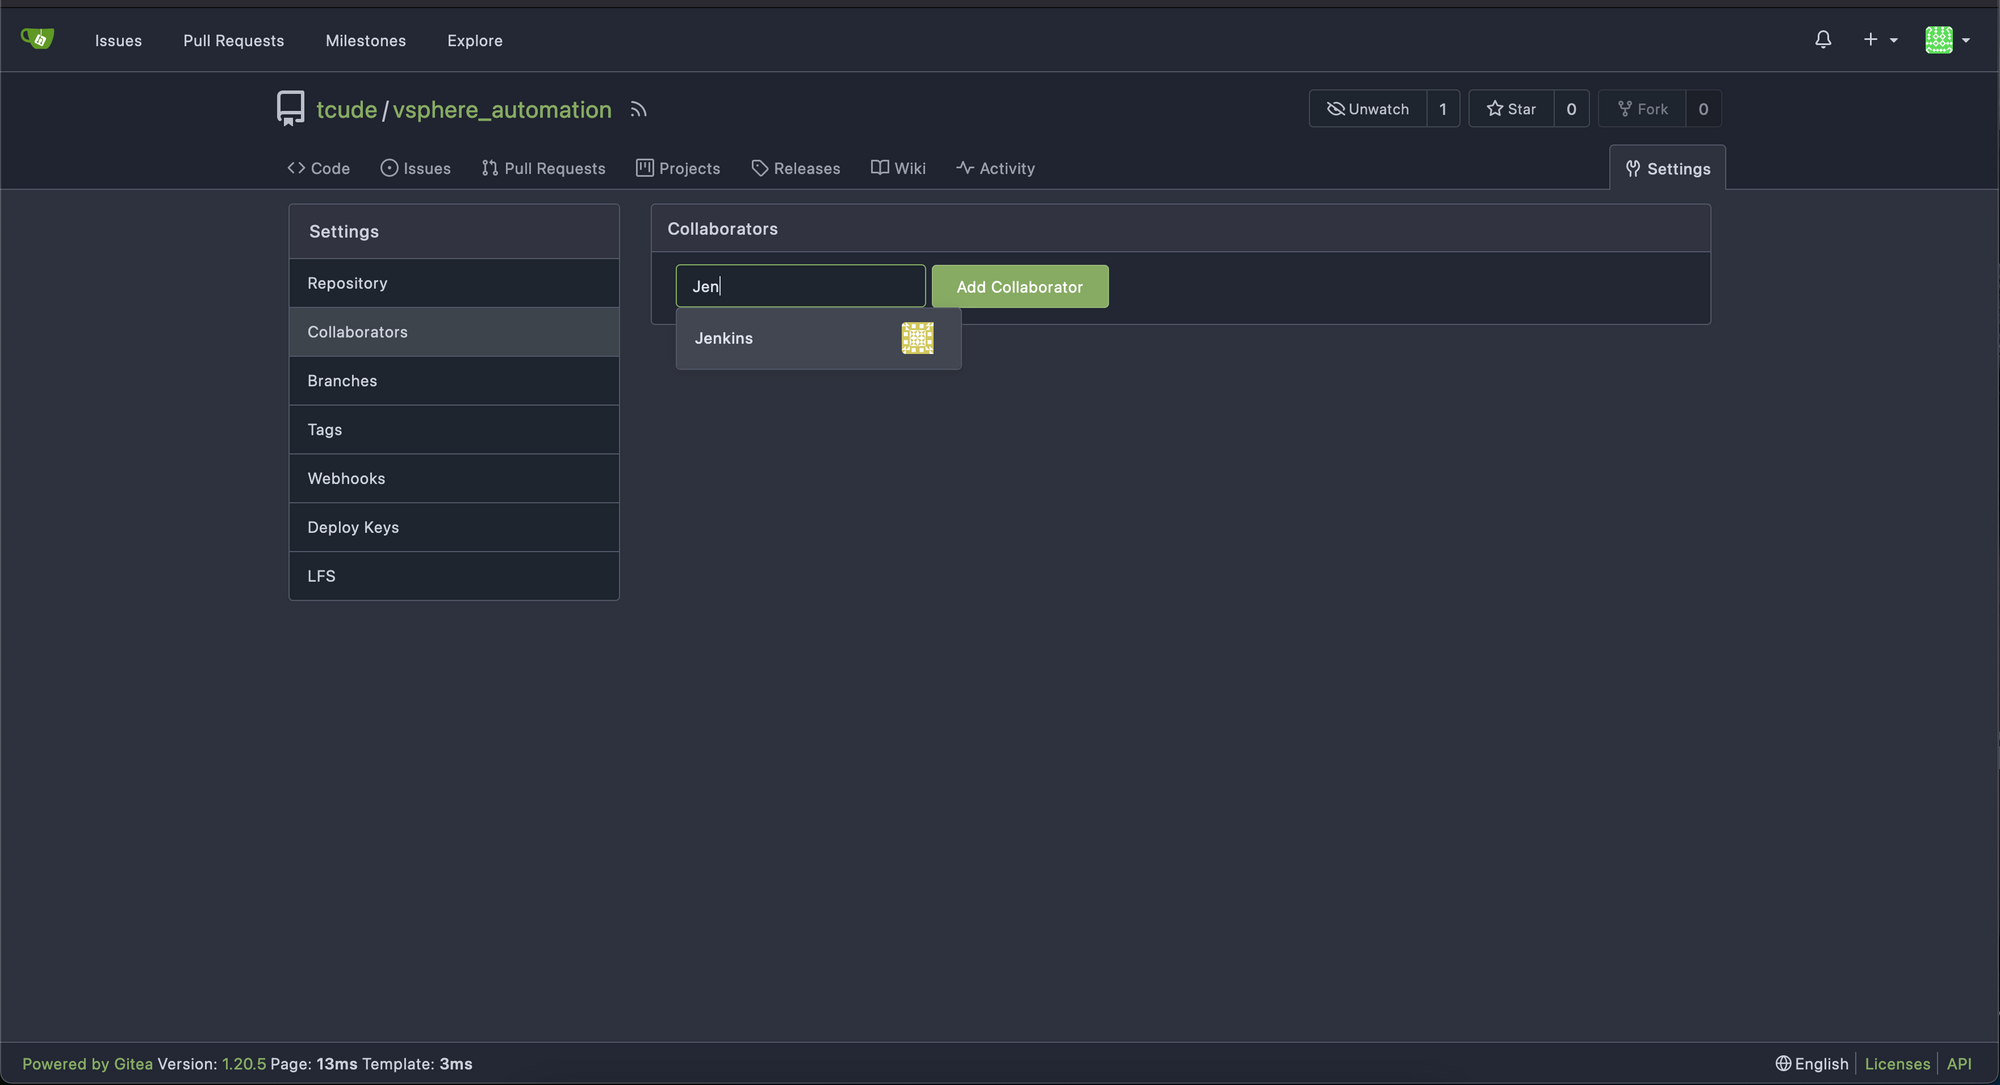
Next, add your newly created Jenkins user as a collaborator to your git project.
Creating the Jenkinsfile
Before configuring the actual Pipeline job within the Jenkins UI, you will need to create a new file in the root of your repository (and then commit/push it to your repo once done) named Jenkinsfile. Within that file, you will populate it with something like this:
// This Jenkinsfile defines a declarative pipeline
pipeline {
    // Specifies that this pipeline can run on any available agent
    agent any

    // Defines the sequence of stages that will be executed
    stages {
        // This stage checks out the source code from the SCM (Source Code Management) system
        stage('Checkout') {
            steps {
                // This command checks out the source code from the SCM into the Jenkins workspace
                checkout scm
            }
        }

        // This stage validates the Packer template
        stage('Validate Packer Template') {
            steps {
                script {
                    // This command validates the Packer HCL (HashiCorp Configuration Language) template using the provided variable files.  Ensure these file names are correct for your setup.
                    sh "packer validate -var-file variables.pkrvars100GBdisk.hcl -var-file vsphere.pkrvars.hcl ubuntu-22.04.pkr.hcl"
                }
            }
        }

        // This stage builds a VMWare image using Packer
        stage('Build VMWare Image') {
            when {
                // This condition ensures that this stage will only run if the previous 'Validate Packer Template' stage succeeded
                expression { currentBuild.resultIsBetterOrEqualTo('SUCCESS') }
            }
            steps {
                script {
                    // This command builds a VMWare image using Packer with the provided variable files
                    // It will forcefully build the image even if it exists and will prompt for action on any errors
                    // Ensure these file names are correct for your setup
                    sh "packer build -force -on-error=ask -var-file variables.pkrvars100GBdisk.hcl -var-file vsphere.pkrvars.hcl ubuntu-22.04.pkr.hcl"
                }
            }
        }
    }

    // Defines actions to be executed after the stages, regardless of their outcome
    post {
        // This will always archive any .log files in the workspace, even if there are none
        always {
            archiveArtifacts artifacts: '**/*.log', allowEmptyArchive: true
        }
        // If any stage failed, this will print an error message
        failure {
            echo "The build failed. Please check the logs."
        }
    }
}
The Jenkinsfile defines a pipeline that performs three main tasks: first, it checks out the source code from the source control management (SCM) system; next, it validates a Packer template for building VMWare images; and if the validation is successful, it proceeds to build the VMWare image using the specified Packer template. After all stages, it archives any .log files found in the workspace, and if there's a failure at any stage, a notification message is printed for the user to check the logs.
Creating the Pipeline
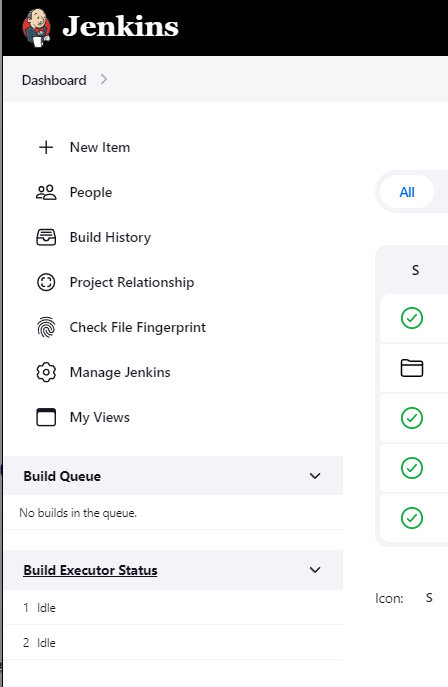
Now that the Jenkins user is created in Gitea and the Jenkinsfile exists within your repository, we can proceed with creating our Pipeline. Starting on the Jenkins dashboard, select New Item
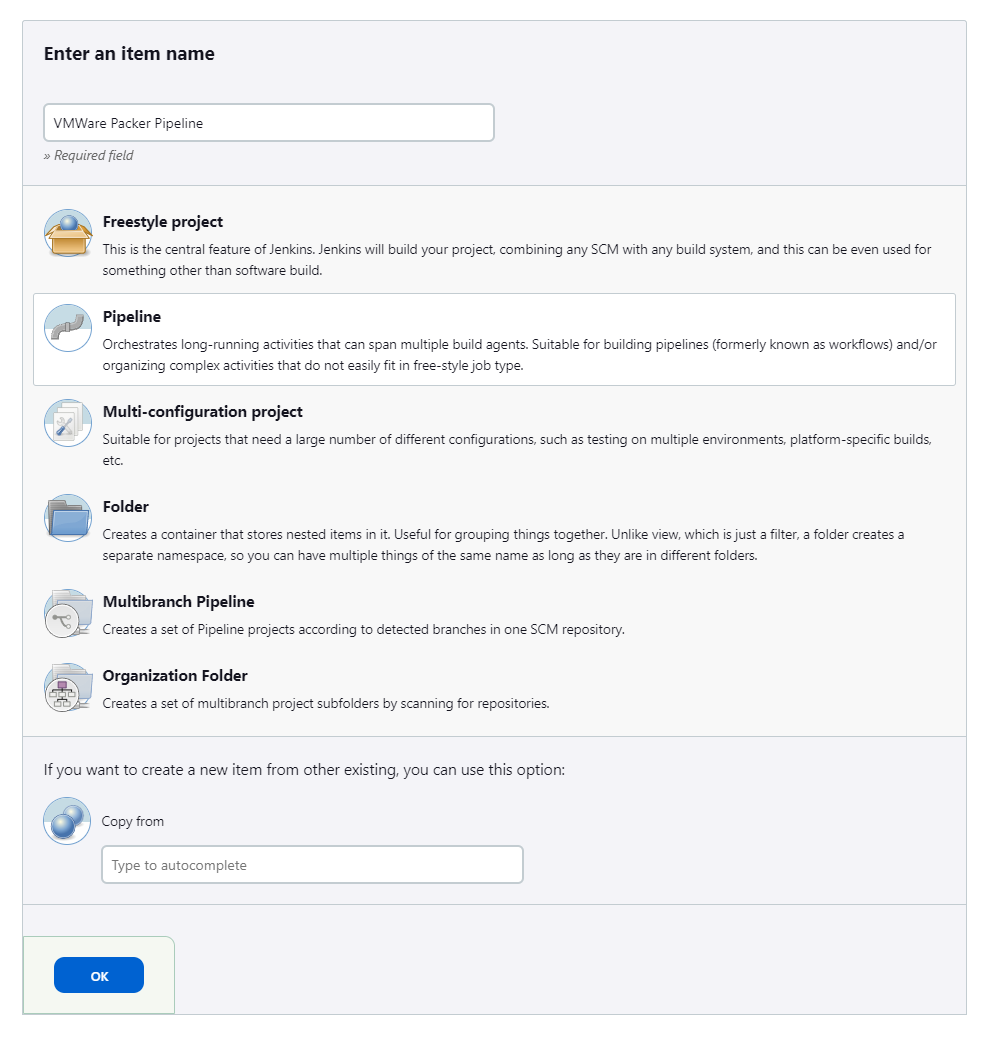
Give your new item a name, then select Pipeline and the project type.
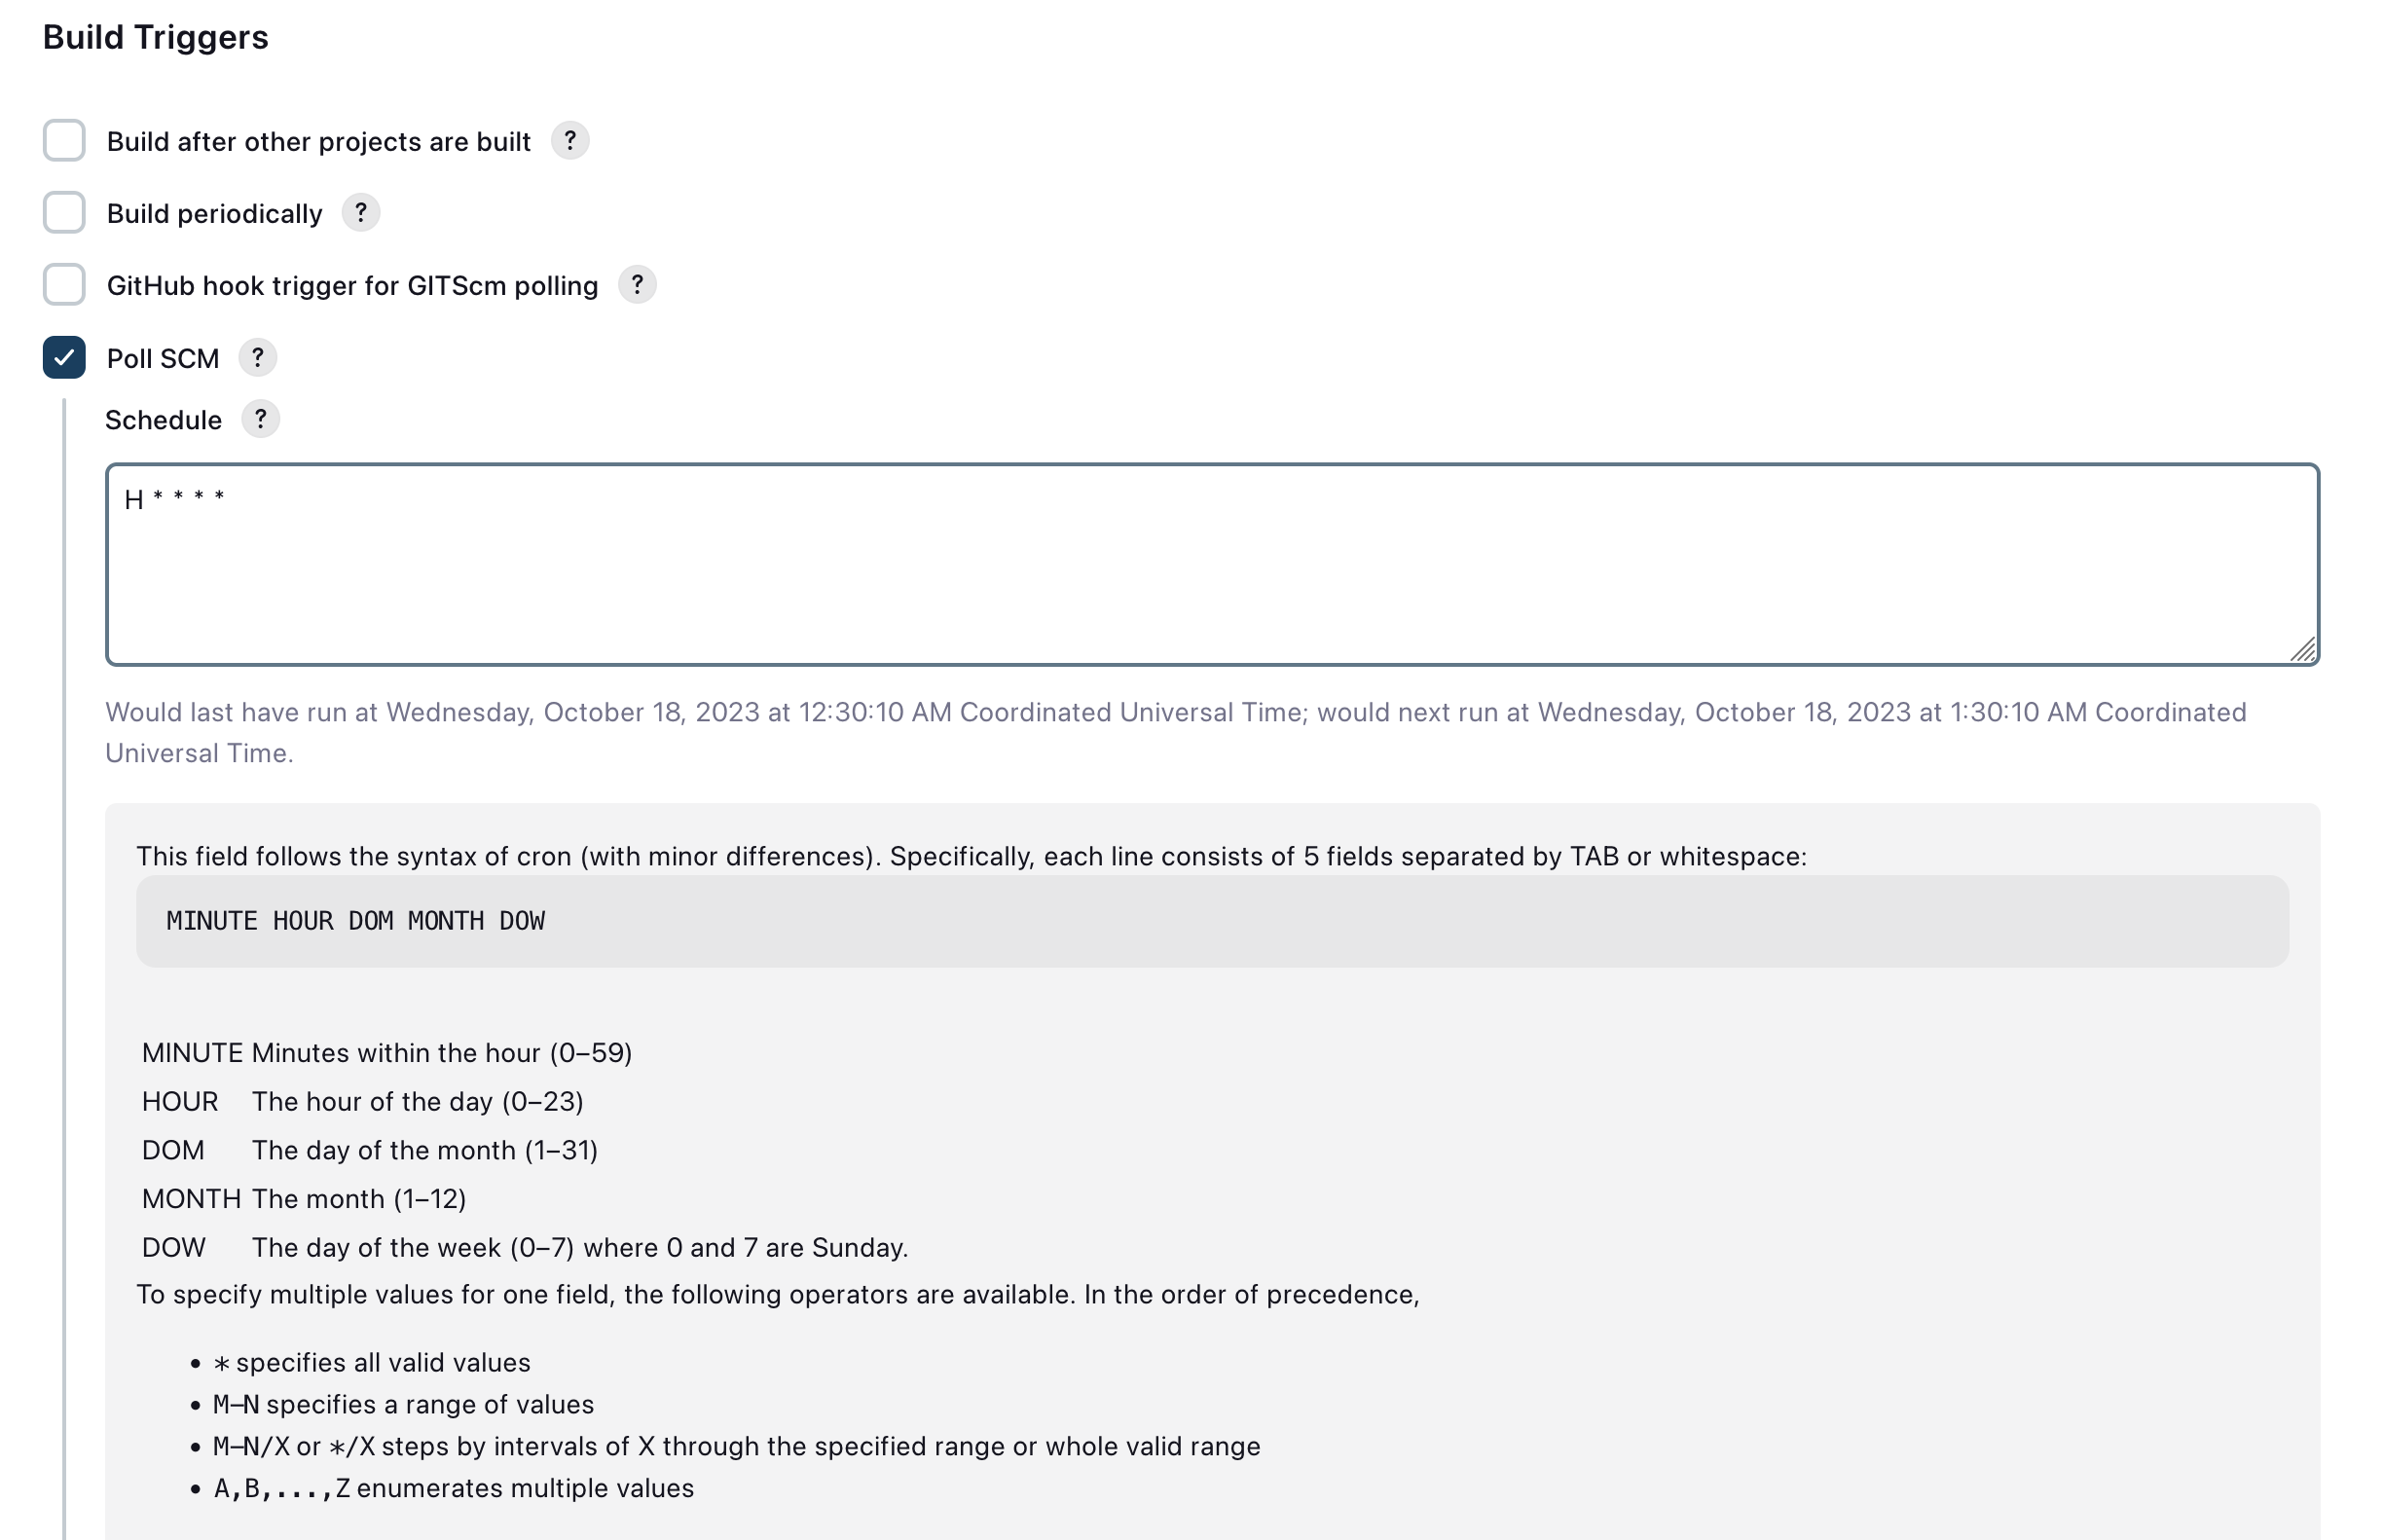
On the new page you will be presented with to configure your pipeline, one optional item you can use is Poll SCM. This allows Jenkins to periodically poll your repository for changes on a cron-like schedule. In the example I have shown here, it will poll the repository every hour for changes and, if it sees there are new changes to the repository since the last build, it will start a new build with the new code.
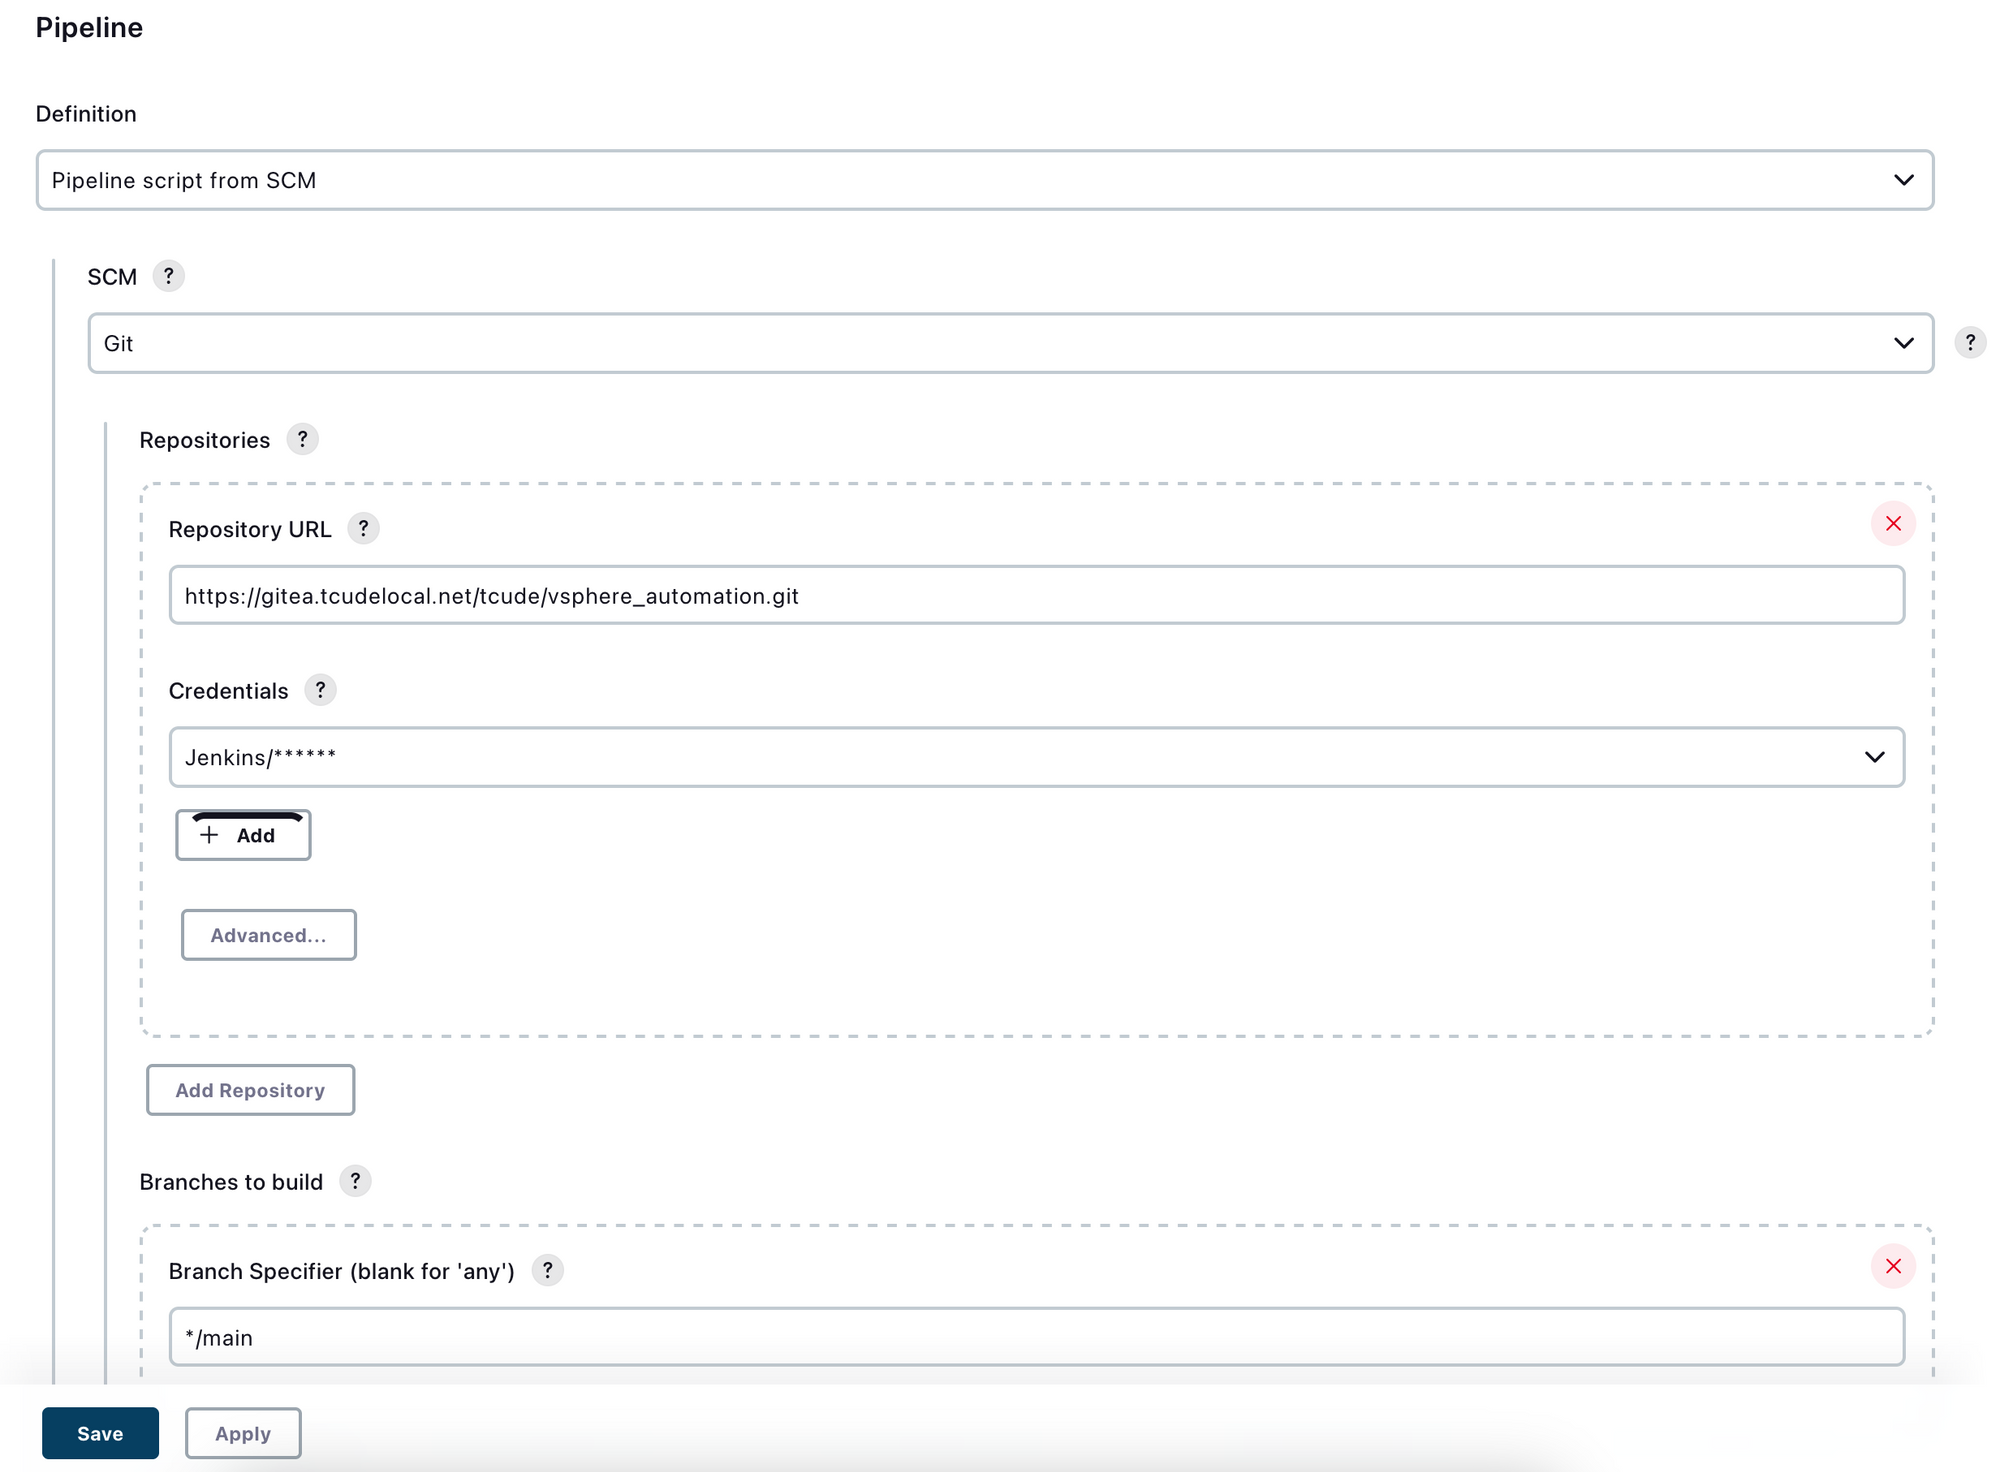
For the next step, there will be a bit more configuration involved. To start, change the Definition dropdown to Pipeline script from SCM. Basically, this means that the pipeline will reference a Jenkinsfile in the repository (which I will show at the end of this guide). You will then need to populate the Repository URL.
Next, set the credentials to those that you created in Gitea earlier. If you haven't already added them within Jenkins, you can simply add them at this point.

One thing to take a look at here is the name of the branch in your repo that you would like to pull from. By default, I believe this was set to */master but my branch name is main.
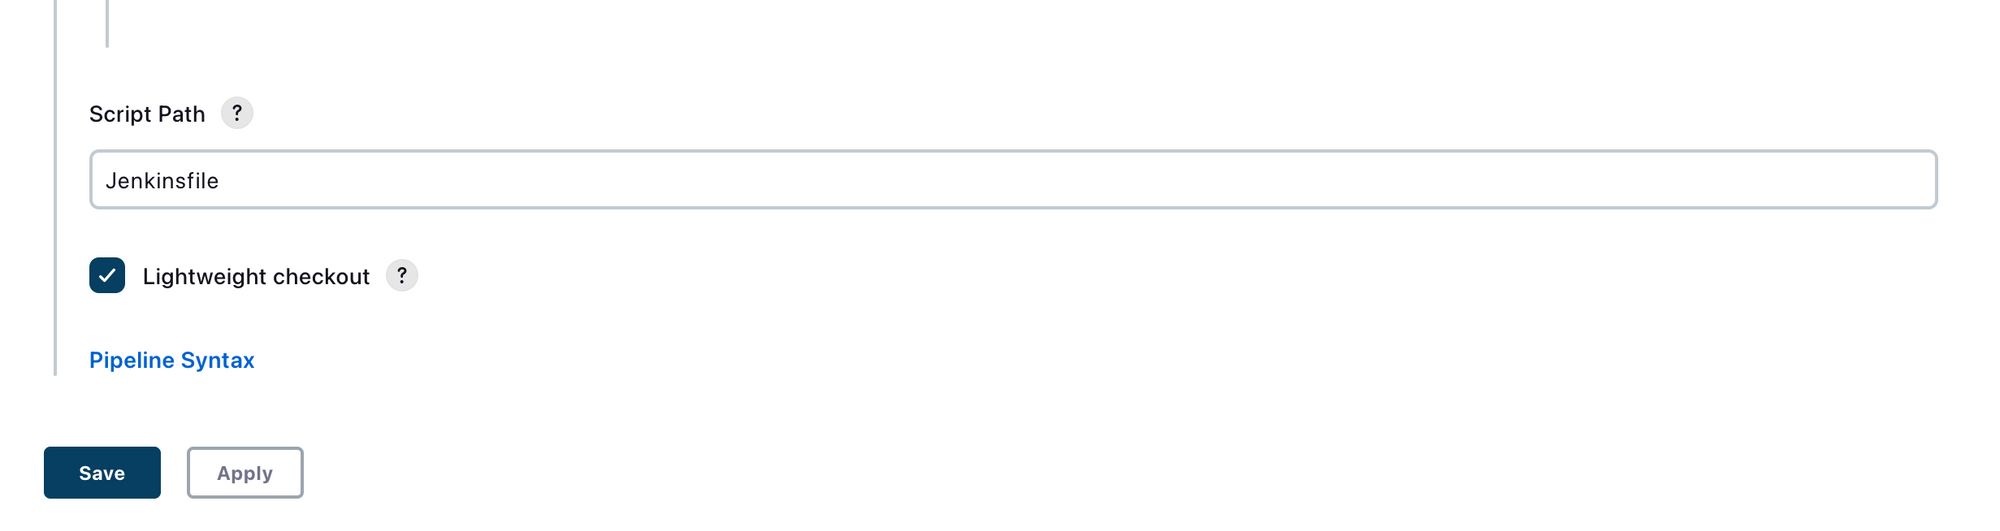
Finally, at the bottom of this configuration page, you can see the Script Path field being populated by default with Jenkinsfile. This will reference the Jenkinsfile from your repo.
Running the Pipeline
Assuming this file has been pushed to your repository, you should now be good to proceed with running your Pipeline! To manually run it, simply click Build Now in the Pipeline's page:
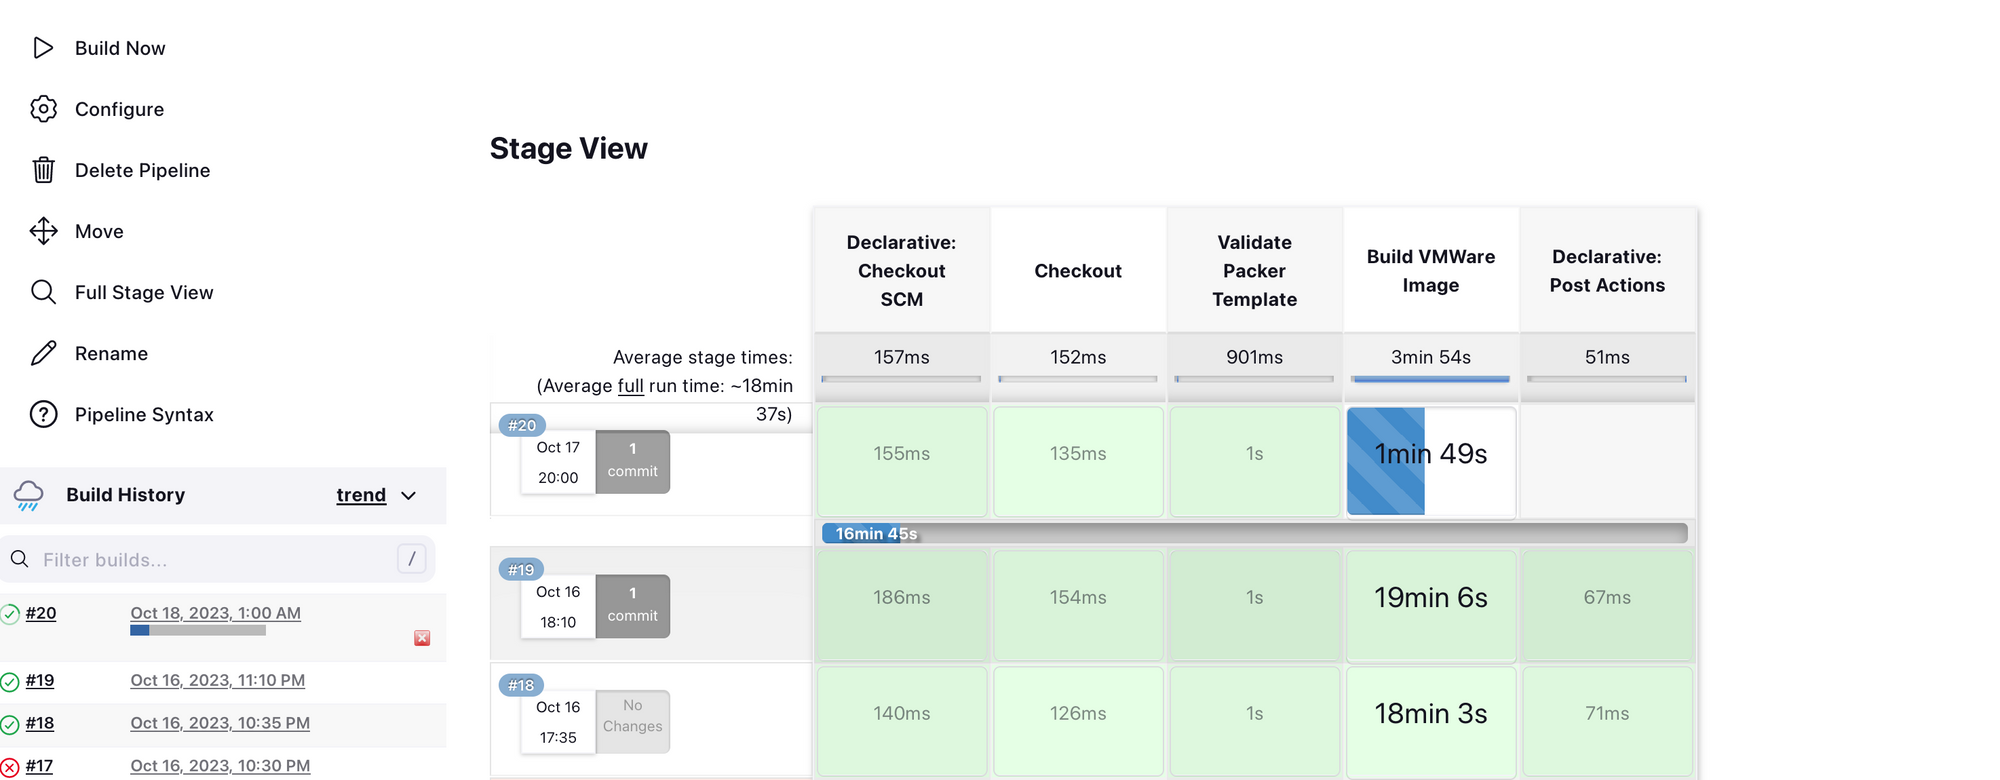
Within it, you should see something similar to this, showing it build through the steps we described in the Jenkinsfile.
Conclusion
We've journeyed through the process of automating the creation of VMWare images using a combination of Jenkins, Gitea, and Packer. By integrating these tools, we've not only streamlined the build process but also ensured consistency and reduced manual intervention, which can often be prone to errors. This setup, built upon the principles of Infrastructure as Code (IaC), elevates our ability to maintain a reproducible infrastructure, allowing for rapid iterations and adjustments as required.
With this Jenkins pipeline in place, every change to our Packer repo triggers a well-orchestrated series of events, from validating our Packer templates to building the VMWare images. This automation ensures that our infrastructure remains up-to-date, secure, and efficient.
For those who've transitioned from manual builds to this automated setup, the benefits will be evident in terms of time saved and consistency achieved. And if this is your first foray into Jenkins pipelines or IaC, it's an exciting introduction to the world of automated infrastructure management.
Looking ahead, the possibilities are endless. As technologies evolve and our infrastructure needs grow, there's ample scope to expand and refine our pipeline, integrate additional tools, or delve deeper into advanced Jenkins functionalities. Stay tuned for more insights, and always remember: automation is not just about making tasks easier; it's about making our systems smarter, more reliable, and more responsive to our ever-changing needs. Happy building!
Consider subscribing to my site or following my RSS feed