An Introduction to Ansible


While I've been doing the occasional quick write up on new hardware I've obtained or neat tricks I've learned in Linux, it's been quite a while since I've written about new technologies I've been familiarizing myself with.
Today, I will be introducing you to Ansible – a really neat tool to assist you in the automation of many tasks you might otherwise have to do manually in Linux.
What is Ansible?
To dive a bit deeper into that last statement, Ansible is an agentless tool that can assist you with the provisioning, configuration, general maintenance of your Linux-based servers. With it being agentless, it is not necessary to install any sort of client on any of your servers to utilize Ansible's capabilities. Ansible operates entirely through SSH.
That being said, Ansible allows you to automate many repetitive, time consuming, or otherwise boring tasks you may be doing manually at this point. The value of this automation grows as your list of servers does. At some point, it becomes fairly time consuming to manually remote in to each of your servers to perform basic tasks, such as updating it.
This is where Ansible steps in to take care of all these things for you with a simple command.
Setting Up Our Ansible Environment
To preface, this guide will be showing you how to use Ansible with password-based authentication, versus key-based authentication. I urge you to use key-based authentication if possible but did not want that to be a barrier of entry for this guide if you don't already have that set up in your environment.
Now that we have that covered, let's go ahead and set up the environment we'll be running Ansible from. If you're like me, you're already running a hypervisor. I've used mine to spin up an Ubuntu VM to perform all Ansible duties.
Once created, you'll need to run the following commands:
sudo apt update

sudo apt install software-properties-common

sudo apt-add-repository --yes --update ppa:ansible/ansible
These three commands will prepare your server for Ansible to be installed. We can now install Ansible, itself, by running the following command:
sudo apt install ansible Now that we have Ansible installed, you can view a bit of information about it by running ansible --version.

Here we can see an example of the output my server provided. It's important to take note of the version of Python you're running, as Ansible requires Python 3.5 or newer.
Creating Our Host Inventory
Now that we have Ansible installed and running on our server, we need to feed it a list of hosts for it to work with. We'll do this by creating an inventory file called "hosts". You can name this file whatever you'd like but that's the name I went with.
Now that we have the file created, we'll need to go ahead and give it an attribute to group our servers. You could use something generic like [servers] but I chose to break things out by distro, as you can see in the image below. Currently, I'm only running Ubuntu servers or you'd see other distro attributes listed in blue.
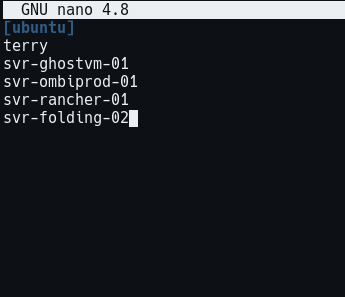
Once you have established the attribute(s) you would like to use, you will simply list the hosts you'd like to interact with using Ansible. It's worth noting that you're able to use either the DNS name of the server or the IP of the server if you don't have that set up at this point.
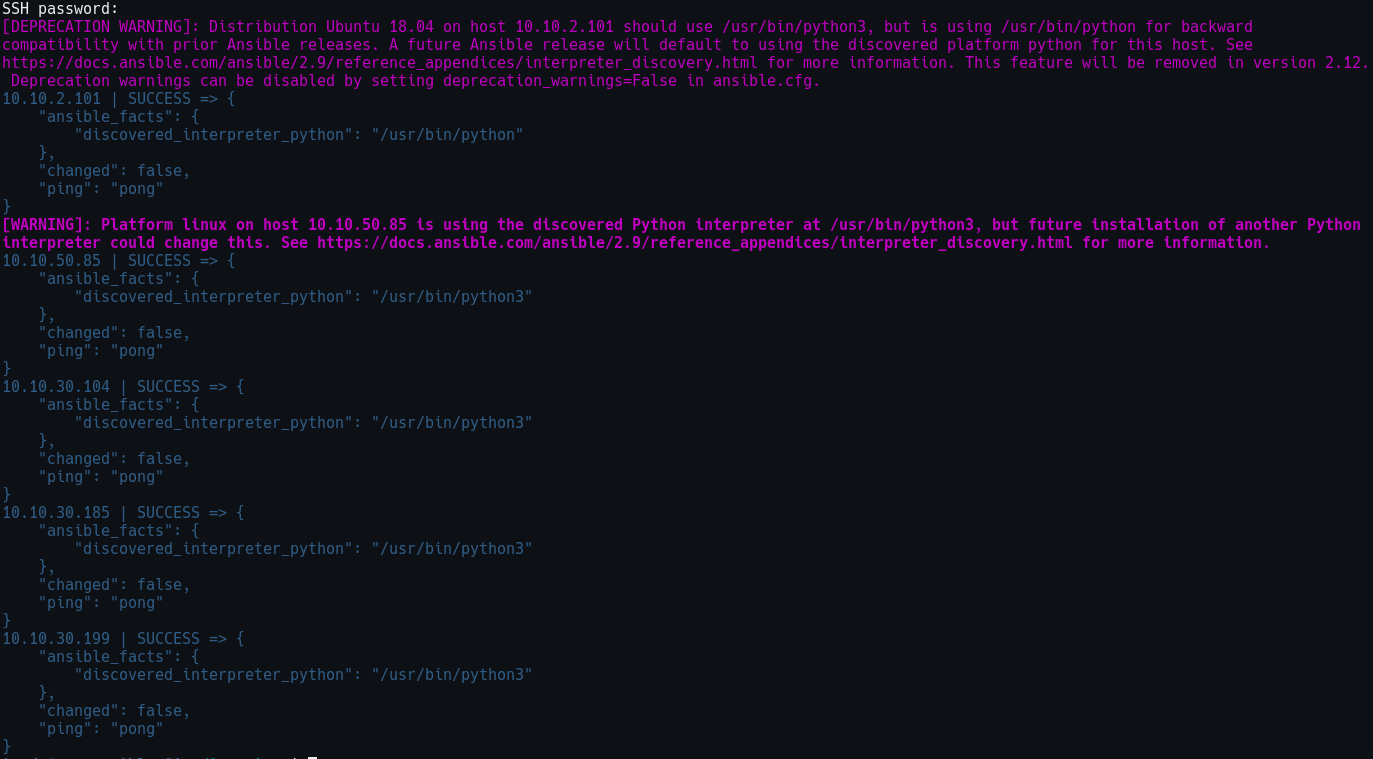
Once this file has been populated with your attribute(s) and list of servers, you should be ready to start getting to work with Ansible. We're going to start off by simply pinging each of our hosts, while using Ansible to do it for us. You can do so with the following command:
ansible -i /path/to/hosts/file/ ubuntu -m ping --user (insert user here) --ask-passIf everything goes as it should, you should receive output similar to what is shown in the image below.
Should you be unlucky like me, you might initially instead receive an output that looks something like this:
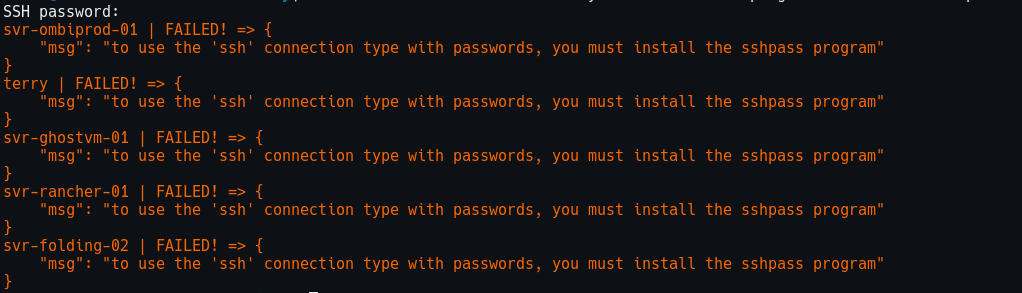
If that's the case, you will need to install sshpass on your Ansible host by running sudo apt install sshpass.
Conclusion
After following these steps, you should now have a functional Ansible environment that is able to communicate with each of your servers. While we haven't gotten into any sort of automation yet, I wanted to cover the basics of how to get Ansible installed and working.
In the next blog post, we will be diving deeper into actually automating things with Ansible by setting it up to update all of our Ubuntu servers.