Hosting Internal Sites with Nginx


Intro
Assuming you have been homelabbing for a while now, you likely have a plethora of services and applications operating on various IP and port combinations. Some of you may also expose many of these services to the open internet using a reverse proxy, such as Nginx. I have been doing exactly this for the last couple of years but had never gotten around to finding a way to have a reverse proxy handle my internal traffic, just my externally facing services.
For example, my instance of File Browser lives on 10.10.80.210:8081 and is accessible only on my LAN. This address is usable but is not exactly convenient if I'm trying to quickly navigate to it via a web browser. With the use of a reverse proxy, I could have files.tcudelocal.net point to 10.10.80.210:8081 and allow me to more conveniently access my application.
I am writing this guide because having one instance of Nginx going for externally facing services made sense and wasn't much of a hassle for me but iguring out how to have Nginx handle my internal traffic proved to be a bit confusing. Ultimately, I found having a separate, dedicated instance of Nginx for internal traffic to be the best route to go. Today I will show you how to achieve exactly this!
Step One: Deciding on a Domain Name
To start, it is worth noting that the domain name you would like to use within your local sites should ideally not be something that's already in use for internet facing sites. Better yet, purchasing/owning this internal-only domain will allow you to take advantage of great features like SSL in the future. I will be covering this soon in a future blog post.
Step Two: Spinning up Nginx
This step is a bit obvious. To start, you will need to spin up some sort of instance of Nginx. For my purposes, I went ahead and spun up a VM running Ubuntu and installed Nginx. Once you have Nginx up and running, make note of the IP your instance is running on. For me, it is on 10.10.80.20.
Step Three: Configuring DNS
This is where the magic happens. In order for your internal Nginx instance to route requests such as files.tcudelocal.net, you will need to have your DNS server(s) configured to know how to handle such requests.
For my purposes, I am using Active Directory DNS, although you can use other options, such as AdGuard Home or Pi-hole.
As a side note, you will need to ensure that all of your devices/networks you'd like to use with this new Nginx instance are also configured to use the DNS servers you are about to configure.
Assuming you have your local DNS server(s) up and running, you will now need to create an A record, shown below:
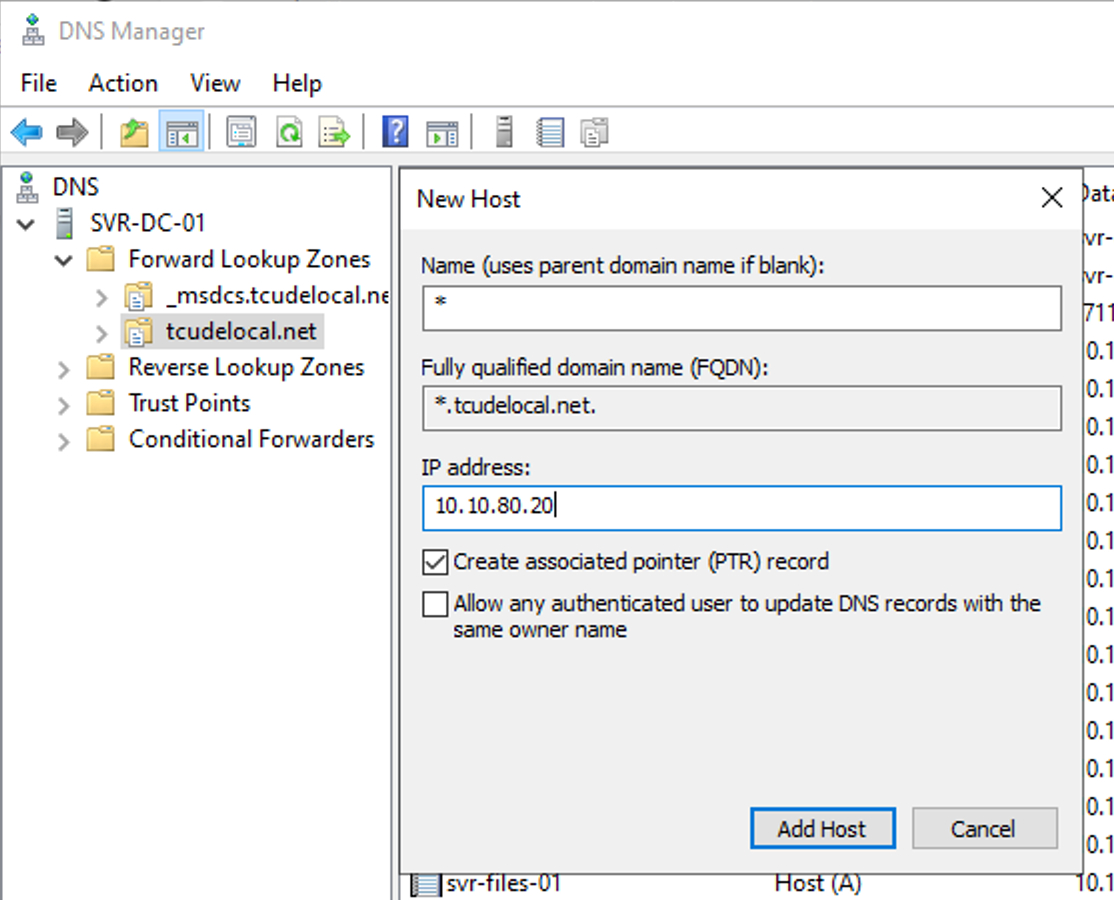
As you can see, I chose to use an asterisk in the Name field. This is what is known as a Wildcard entry, which will direct anything prefixed to .tcudelocal.net to my Nginx instance, which lives on 10.10.80.20.
Step Four: Configuring Nginx
With our current setup, if I were to attempt to navigate to files.tcudelocal.net, my computer would now reach out to the DNS server, who would see that the request should be directed to my Nginx instance on 10.10.80.20, however, Nginx is not currently configured to do anything after that.
Fortunately, creating an Nginx configuration file is fairly straight forward. You can read more about the various configuration options here but I will provide my own example below.
Start by using touch /etc/nginx/sites-enabled/site.conf to create an example site config. I encourage you to read up more on how sites-enabled and sites-available work within Nginx within their provided documentation but doing a quick and dirty direct creation within sites-enabled will work.
Within your new site.conf, using a text editor of your choice, paste the following and modify the obvious settings to fit your needs
server {
  client_max_body_size 16G;
  listen 80;
  listen [::]:80;
  server_name service_name.your_local_domain.xyz;
    location / {
        proxy_pass http://host_ip_here:port_of_app_here/;
        proxy_set_header Host $host;
        proxy_set_header X-Forwarded-Host $server_name;
        proxy_set_header X-Real-IP $remote_addr;
        proxy_set_header X-Forwarded-For $proxy_add_x_forwarded_for;
        proxy_read_timeout 90;
        proxy_set_header X-Forwarded-Proto $scheme;
        set $xforwardedssl "off";
        if ($scheme = https) {
            set $xforwardedssl "on";
         }
        proxy_set_header X-Forwarded-Ssl $xforwardedssl;
    }

}
Afterward, all that is required is a simple systemctl reload nginx.service. Should you encounter any issues, journalctl -f -u nginx.service is likely to provide some helpful information.
Conclusion
Assuming your DNS servers are configured and set to be utilized by your network (double check this), you should now be able to create any number of configuration files within Nginx to easily navigate to all of your various sites and services!
I hope you found this helpful, as it took a bit of trial and error on my end. I have been using this setup for the better part of a year and am finally finding the time to write about it. I find it all too common within homelabbing groups to simply expose everything to the open internet and I'd prefer not to, while still taking advantage of some of the ammenities that a reverse proxy like Nginx has to offer.
If you found this article helpful, consider adding my site to your RSS reader using the following URL:
I also have a followup guide to this one, showing how to enable SSL for your newly created internal sites. You can find that here:
